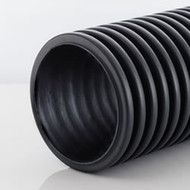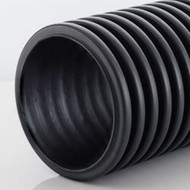
Installing a twinwall drainage system is an unobtrusive but efficient way of removing excess water from areas suffering from poor drainage or regular heavy rainfall. Despite being ridged in their structure, twinwall pipes are very flexible in their uses.
An effective Twinwall drainage system can protect land and property from water damage and improve overall drainage efficiency. However, incorrectly installing twinwall, or correctly installing the wrong type of twinwall, can have the opposite effect. In this guide, we shall try to provide a detailed, step-by-step approach to installing a Twinwall drainage system for DIY enthusiasts that should help you avoid the common pitfalls.
Before going any further, however, we highly recommend checking out our Basic Guide to Twinwall article for information about how to choose the right type of Twinwall. Once you know what type of twinwall will be most suitable for your application, it’s time to start thinking about the installation of it. For anyone who is just interested in seeing a brief overview of what is involved, take a look at our Twinwall installation quick guide.
How do I install Twinwall?
In general, installing Twinwall is a relatively straightforward process that can be tackled by most DIY enthusiasts for garden, driveway, and agricultural applications. Installations in commercial and public spaces should only be undertaken by professionals, as the guidelines and regulations for these applications can be very different!
In theory, a simple trench method, completed by sidefilling/backfilling, is basically all it takes. However, as with most DIY drainage projects, the practical is rarely ever as simple as the theory makes out. That’s why we have put together this detailed, step-by-step installation guide to help you fully prepare yourself for the task.
Important Note: While this guide offers general instructions, remember that complexity can vary depending on your project's specific requirements. Consulting with a qualified drainage professional is always recommended for intricate drainage needs or large-scale projects. Twinwall should always be installed in accordance with the manufacturer’s guidelines.
Before You Begin
The key to any successful installation project is always in the planning and preparation stage. Fail to plan, plan to fail, as the old saying goes. Below is a quick look at all the things we’d recommend doing before you start digging any holes.
- Plan Your Drainage System:
- Assess Drainage Needs - Identify areas requiring drainage (foundations, driveways, gardens, etc.) and the direction of natural water flow.
- Sketch a Layout - Create a basic plan of your property, marking the planned pipe path, discharge point (drain, soakaway, etc.), and locations for inspection chambers.
- Calculate Pipe Capacity - Estimate the volume of water the system will handle based on area size and rainfall patterns.
- Obtain Necessary Permits - Contact your local building authority to determine if permits are required for your project and to understand any relevant drainage regulations.
- Gather Materials:
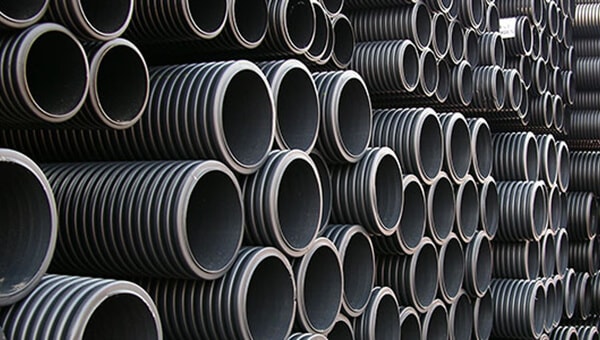
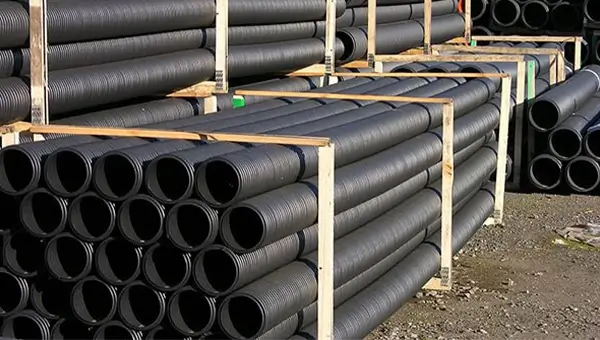
- Twinwall Pipes - Select the appropriate pipe diameter based on your calculated water flow and by following the manufacturer's recommendations. Choose perforated pipes for collecting water from surrounding soil (around foundations, fields) and unperforated pipes for channelling collected surface water (driveways, roads).
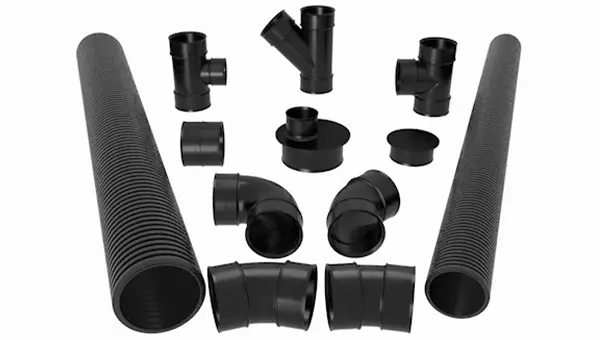
- Fittings - you will likely need an assortment of bends, couplers, reducers, end caps, depending on your planned layout. Make sure all your fittings are compatible with your chosen type of pipe/brand.
- Inspection Chambers (Optional) - Useful at strategic points for system access and cleaning – essential for larger applications.
- Gravel - For trench sidefill and backfill (depending on application).
- Geotextile Membrane - For separating gravel from soil and filtering in specific situations.
- Excavation Tools - Shovels, pickaxes (for hard ground), safety gear (gloves, safety glasses, sturdy boots).
- Pipe Cutting Tools - Handsaw, power saw with appropriate blade, or pipe cutters for Twinwall pipes.
We realise that some of the recommendations listed above may appear more daunting than the average DIYer might have bargained for. With that in mind, we have written a separate article that explains all the twinwall installation planning and preparation steps in a lot more detail.
Once the preparations for your twinwall drainage system are complete, you can move on to the installation stage.
Step 0. Twinwall Installation Safety Precautions
Throughout this guide, we will highlight any and all key safety precautions and best practices to follow as and when they are relevant, but here is a quick list to begin with that you should be mindful of at all times during the installation process.
- Always prioritise safety throughout the installation process.
- Always wear appropriate PPE throughout the excavation and installation process. This includes sturdy boots with good ankle support, gloves to protect your hands, safety glasses to shield your eyes from debris, and a high-visibility vest to increase your visibility if working near roads or in low-light conditions.
- Use proper lifting techniques to avoid back strain when handling pipes, especially larger diameters.
- Be aware of the potential hazards of trench collapse and take necessary shoring precautions for deep trenches.
- Always refer to the specific installation instructions provided by the manufacturer of your chosen Twinwall pipes and fittings.
- If you encounter any underground utilities during excavation, stop work immediately and contact the relevant utility company.
Remember: For complex drainage projects or if you're unsure about any aspect of the installation, consulting with a qualified drainage professional is highly recommended. They can help ensure a successful and efficient Twinwall drainage system for your property.
Once you feel confident that you are fully prepared and are ready to begin your installation, it’s time to start digging.
Step 1. Excavate the Twinwall Drainage Trench
| Recommended Tools | |||||
|---|---|---|---|---|---|
| Tape Measure | String and Stakes | Chalk | Pickaxe | Shovel & Trowel | |
Trench excavation is the initial groundwork for your Twinwall drainage system. Essentially, this boils down to “dig a big hole for the pipe to go in”, but the following breakdown of tasks will help you ensure that you dig a big enough hole in the right places.
Plan the Trench Path
- Using the drainage map/plan you should have drafted up during the planning and preparation stage of your project, mark out the trench outline using with stakes and string, maker tape, or chalk, depending on the surface. This will ensure that you excavate in the right location and allow you to double-check the planned route for the pipes, bends, junctions, and any inspection chambers to avoid unnecessarily damaging surrounding areas.

Excavate the Trench
- Using the appropriate tools for the ground conditions in your chosen installation area, begin digging along your trench path to the correct depth and width for your chosen pipe size. Shovels are generally suitable for most soil types, but for tougher ground or compacted soil, a pickaxe might be necessary. Trenchers can expedite excavation in large-scale projects, but unless you are a qualified operator, we’d highly recommend calling in a professional to help with this.

Important things to consider
- Lawn Care - If installing under a lawn, try to dig up the grass layer as carefully as possible. This will make it easier to replace once the installation is complete.
- Excavated Material - Make sure any excavated material, be it soil, concrete, hardcore, etc., is placed far enough away from the trench to avoid it falling back in as the mound gets bigger. Remember to dispose of any excess materials responsibly in accordance with your local regulations.
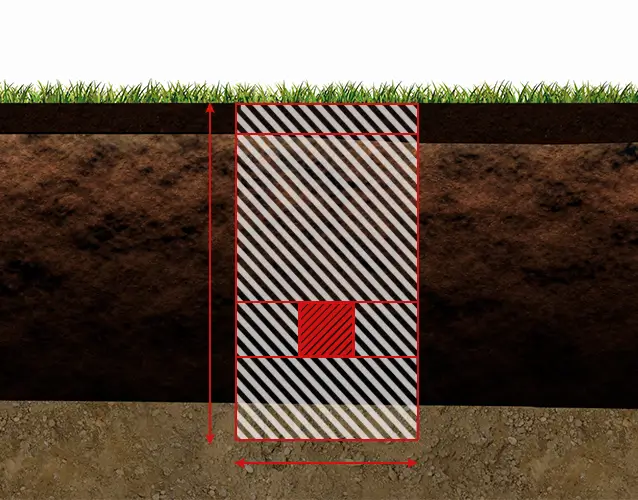
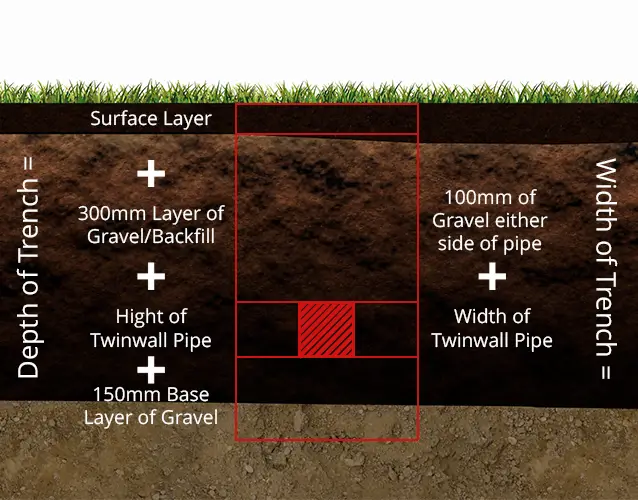
- Trench Depth and Width - Refer to the trenching considerations table in the "Trenching Considerations" section of the Planning and Preparing guide for general recommendations on trench depth and width based on chosen pipe diameter. Remember, these are general guidelines.
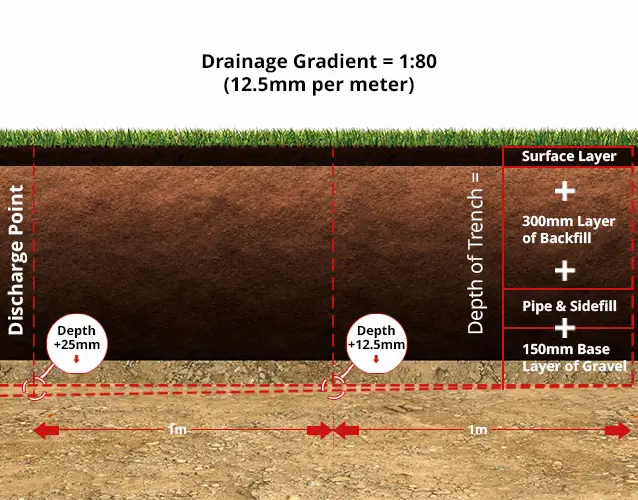
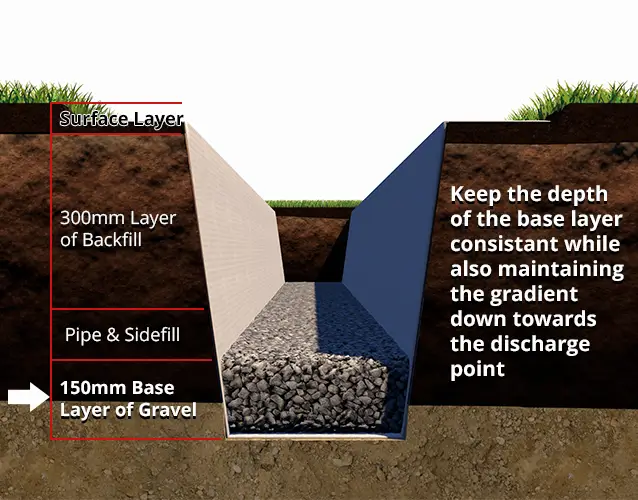
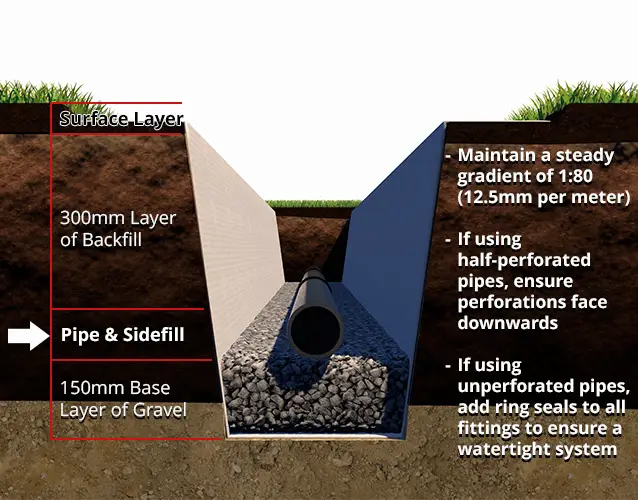
- Grading the Trench Bottom - As you excavate, ensure the bottom of the trench slopes slightly downwards towards the discharge point. The recommended minimum gradient is 1mm fall (drop) for every 80mm of trench length or 12.5mm per metre.
- Start at the Discharge Point - Begin excavation at the lowest point of the trench, which is typically the connection point to the drain, soakaway, or another designated discharge location. Working from the discharge point upwards ensures proper grading for water flow throughout the system.
- Shoring (if necessary) - If the trench depth exceeds 1.2 metres (4 feet), proper shoring is crucial to prevent trench collapse and potential injury. Shoring involves using temporary support structures to stabilise the trench walls. This is unlikely to be the case for most domestic installations, but worth mentioning just in case – always consult a qualified professional for shoring techniques and recommendations specific to your soil conditions and trench depth.
Check for Underground Utilities
Remember to call before you dig to locate and mark any underground utilities in your work area. Avoid working near unmarked utility lines and stop work immediately if you encounter one. Contact the relevant utility company for guidance.
By carefully planning the trench path, using the appropriate excavation techniques, maintaining proper grading, and prioritising safety, you should be able to lay the foundation for a successful Twinwall drainage system installation. Once the trench has been dug, it’s time to move on to the next step.
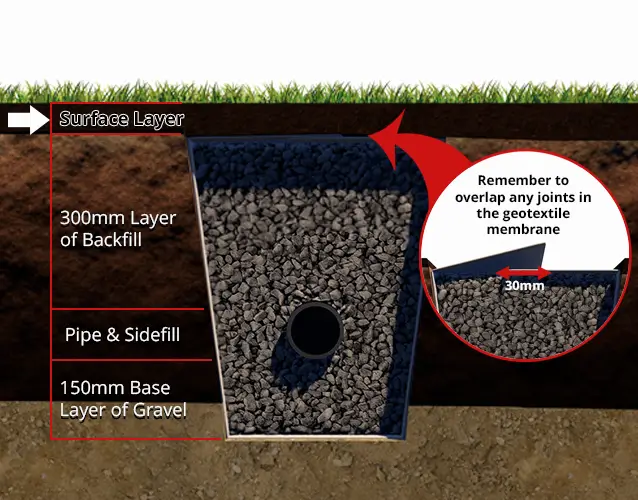
Step 2. Add Geotextile Membrane Layer to the Twinwall Trench
| Recommended Tools | |||||
|---|---|---|---|---|---|
| Sharp Knife/Scissors | |||||
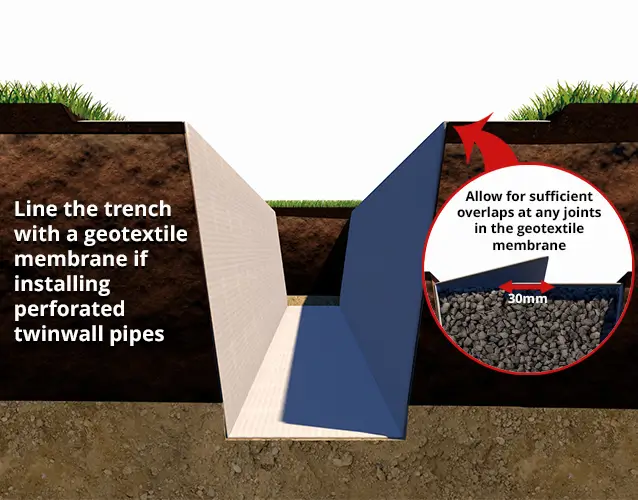
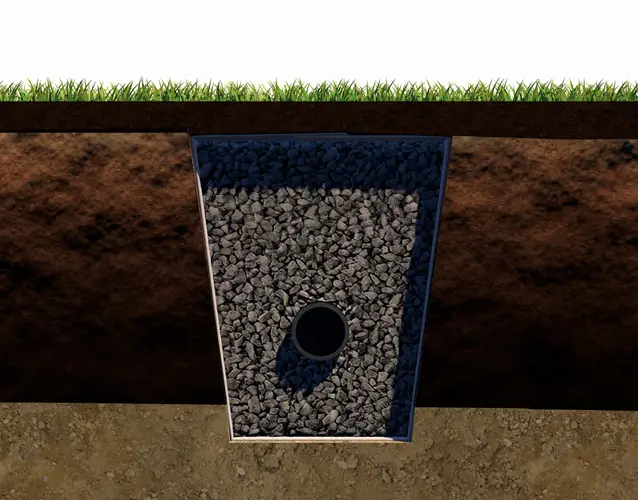
A geotextile membrane is a fabric-like material often used in conjunction with perforated Twinwall drainage systems to prevent surrounding soil particles, especially fine particles in sandy soils, from entering the drainage system. This separation layer helps maintain long-term drainage efficiency by preventing the perforations in the pipe from becoming clogged. For detailed information on the benefits of using a geotextile membrane and when it may or may not be necessary for your project, refer to the “Geotextile” section in our Twinwall Installation Planning Guide.
How to Install a Geotextile Membrane for Twinwall Drainage
There are two common placement options for the geotextile membrane:
- Beneath the Gravel Layer (if used) - Unfold the geotextile membrane over the entire trench base before adding the gravel bedding layer. Ensure the membrane extends up the trench walls and slightly out of the top to provide complete coverage when closed over the eventual backfill layer.
- Directly Around Perforated Pipes (without Gravel) - If you choose not to use a gravel base layer or backfill, you can wrap the geotextile membrane directly around the perforated pipes, to protect it from the fine particles of whatever fill material you do choose.
Important things to consider:
- Overlaps and Seams - Ensure sufficient overlaps (typically around 30cm) at the joints of the geotextile membrane to prevent gaps and maintain an effective barrier. Seams can be secured using specialist geotextile tapes or staples designed for this purpose.
- Tears or Punctures - Avoid any tears or punctures in the geotextile membrane during installation, as these can compromise its effectiveness. If accidental damage occurs, patch the area with a suitable repair material.
With the geotextile layer in place, you can move on to adding a suitable bedding layer.
Step 3. Add a Bedding Layer to the Twinwall Trench
| Recommended Tools | |||||
|---|---|---|---|---|---|
| Sand or Gravel | Compactor | Spirit Level | |||
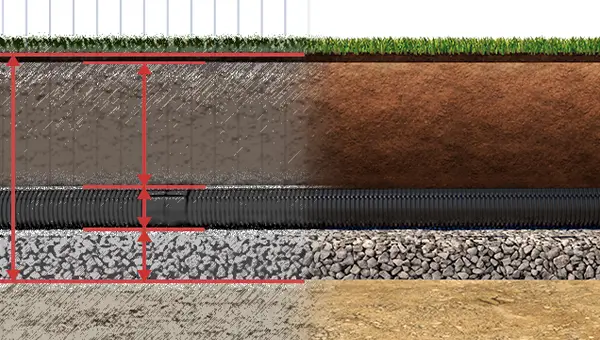
While not always necessary, adding a layer of gravel (crushed stone) at the bottom of the trench can help support the pipe and, in the case of perforated twinwall, significantly enhance the drainage performance of your system. For detailed information on the benefits of using a gravel bedding layer and when it may or may not be necessary for your project, refer to the “Gravel” section in our Twinwall Installation Planning Guide.
Note: If installing an unperforated twinwall drainage system, you can replace a gravel base layer with 100-150mm of sand instead. This will just support the pipe and make it easier to maintain the desired drainage gradient.
How to add a gravel bedding layer in a twinwall installation
Adding gravel to a trench is fairly self-explanatory, but here are a few things just to keep in mind:
- Placement - Before the pipes and fittings are installed in the trench, carefully pour in a 100-150mm layer of appropriate gravel. Be careful not to over or underfill in a way that might counteract the drainage gradient of the trench.
- Gravel Size - Choose crushed stone with a diameter between 10mm and 20mm. This size range allows for optimal water flow while preventing smaller soil particles from filtering through.
- Compaction (Optional) - In some cases, lightly compacting the gravel layer in stages can further improve its stability and drainage efficiency. However, avoid over-compacting, as this can restrict water flow.
Once the bedding layer has been added, it’s time to start laying the pipe.
Step 4. Install the Twinwall Pipes and Fittings
| Recommended Tools & Parts | |||||
|---|---|---|---|---|---|
| Twinwall pipes | Twinwall fittings | Saw/Pipe Cutter | Spirit Level | ||
After the trench is excavated and any geotextile and/or bedding layers are added as needed, it's time to start installing the Twinwall pipes and fittings to build up your planned drainage system.
Pipe Layout and Assembly
Before placing your pipes into the trench, it can be beneficial to lay them out on the surface to double-check your planned system. Once you are happy that you have all the right pieces ready to go, you can begin the installation.
- Start at the Discharge Point - Begin by placing the first pipe at the discharge point, ensuring a secure connection. Work your way back up along the trench, following the planned layout from your drainage map.
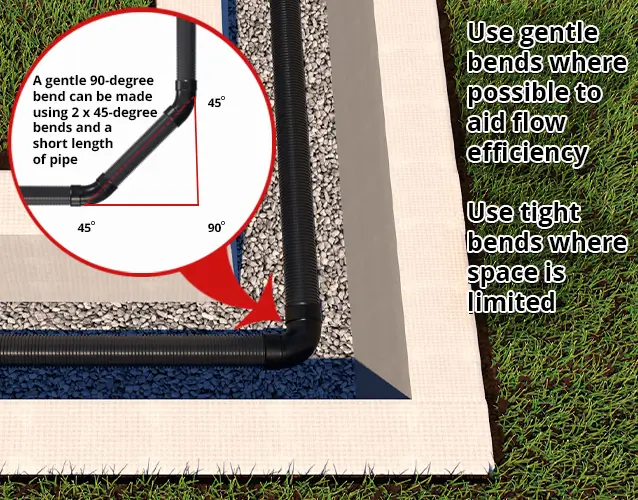
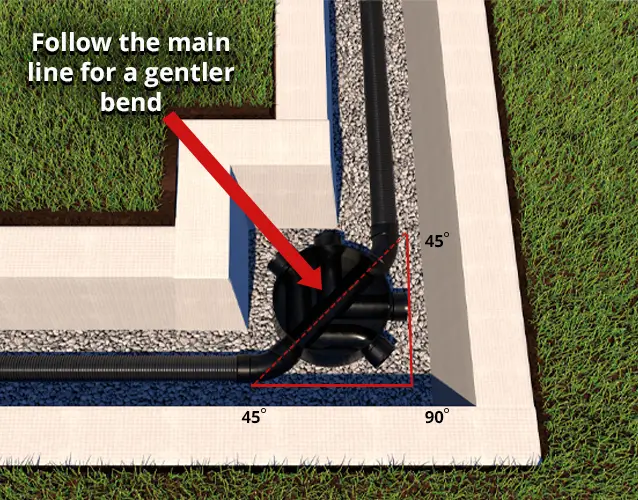
- Connections and Changes in Direction - Use the appropriate couplers, bends (90-degree bends, 45-degree bends, etc.), and junctions to connect the lengths of twinwall pipe together and follow the trench's path, navigating corners or changes in direction as needed. Unless you are restricted on space, try to avoid sharp 90-degree bends if possible. A gentler bend can be achieved with two 45-degree bends and a short length of pipe between them that will be less restrictive on the flow of water.
- Inspection Chambers - If you have decided to install inspection chambers in your system to facilitate easier cleaning, maintenance, and system inspections in the future, make sure you review Step 5 in tandem with this one for guidance.
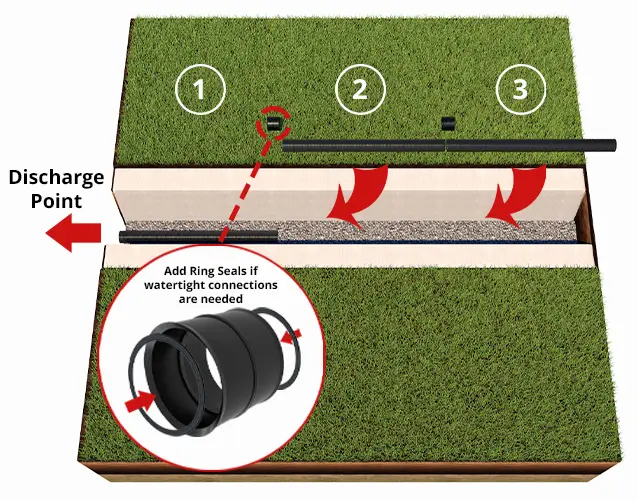
Note: If you are installing unperforated twinwall pipes, you will need to add ring seals to any fittings used to ensure a watertight system.
Important things to consider:
- Cutting Pipes (if necessary) - If you need to make any cuts to your twinwall pipe lengths, try to do so at the opposite end of the system from the discharge point where possible. Measure and mark the pipes with care, to ensure accurate lengths for proper fitting into the overall layout, then use an appropriate saw or pipe cutter to make a clean cut.
- Ensuring a Secure and Functional System:
- Check Connections - Regularly inspect the pipe connections throughout the installation process to ensure they are secure and watertight.
- Maintain Proper Gradient - As you lay the pipes, ensure they maintain the slight downward slope towards the discharge point established during trench excavation (minimum 1mm drop per 80mm trench length/12.5mm per metre). Use a tape measure and level to verify the gradient.
- Pipe Perforations (if applicable) - If using half-perforated pipes to collect water from the surrounding soil, ensure the perforations face downwards to allow water to enter the pipes.
- Manufacturer's Instructions - Refer to the specific installation instructions provided by the manufacturer of your Twinwall pipes and fittings. These instructions will outline best practices for connecting pipes, using specific fittings, and ensuring a functional system.
- Work with a Partner (for large diameter pipes) - For larger diameter pipes, consider having a partner assist you with handling and connecting the pipes to ensure proper alignment and efficient installation.
By following these steps and ensuring secure pipe connections, proper grading, and adherence to the manufacturer's recommendations, you should have no trouble in effectively assembling the drainage network for your Twinwall system.
Step 5. Install Inspection Chambers in the Twinwall System (Optional)
| Recommended Tools & Parts | |||||
|---|---|---|---|---|---|
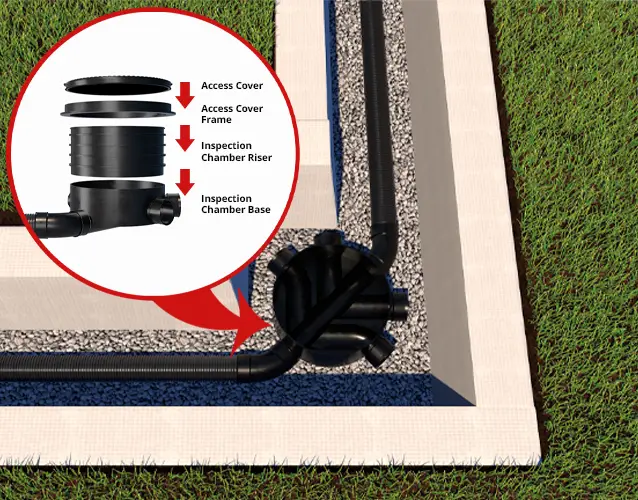
| Inspection Chamber Base | Inspection Chamber Riser | Inspection Chamber Cover & Frame | End Caps | Spirit Level | |
Inspection chambers are optional components in a Twinwall drainage system, but they offer significant advantages for long-term maintenance and system health, especially for larger installations. For detailed information on the benefits of using inspection chambers and when they may or may not be necessary for your project, refer to the “Inspection Chamber” section in our Twinwall Installation Planning Guide.
How to install an Inspection Chamber in a twinwall system
Here is a list of factors you need to consider when installing an inspection chamber:
- Positioning Chambers - If you have planned your system properly, you should already know where you want to install your inspection chambers (ideally at strategic points such as changes in direction, junctions, etc.). However, it is still worth laying them out aboveground with the rest of the system to double-check where extra excavation will be needed.
- Excavation - Create a pit around the designated location for the inspection chamber, ensuring enough space for proper installation and connection to the pipes. The pit depth should be sufficient to accommodate the entire chamber height (including any risers needed and the intended cover), plus an allowance for a bedding layer below the chamber base.
- Bedding - Similar to the pipes, consider adding a 150mm layer of gravel or sand beneath the base of the chamber for improved stability and lightly compact.
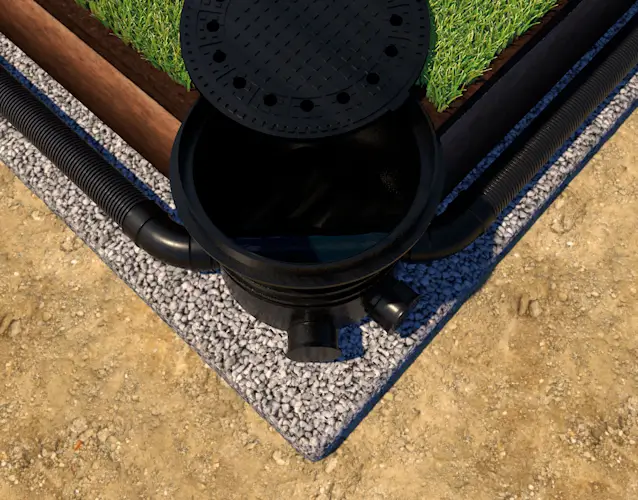
- Chamber Connection - Carefully connect the incoming and outgoing pipes to the designated inlet and outlet ports of the inspection chamber. Follow the manufacturer's instructions for the specific chamber model you're using to ensure secure and watertight connections.
- End Caps - If you are using an inspection chamber with multiple outlet options, make sure you fit end caps to all the ones you won’t be using.
- Levelling and Backfill - Once the pipes are connected, adjust the chamber position to ensure it is level before proceeding to the side-fill and backfill stage of the installation.
- Chamber Riser & Access Cover - An inspection chamber is of little use without an access cover above it on the surface. However, you’ll need to install a chamber riser to connect the two together. They are typically easy to install and can be cut to size. Just make sure that you accurately measure the level at which the access cover will need to sit on the surface. Follow the manufacturer’s guide for your chosen cover to ensure correct installation.
Best Practice for Inspection Chamber Bends
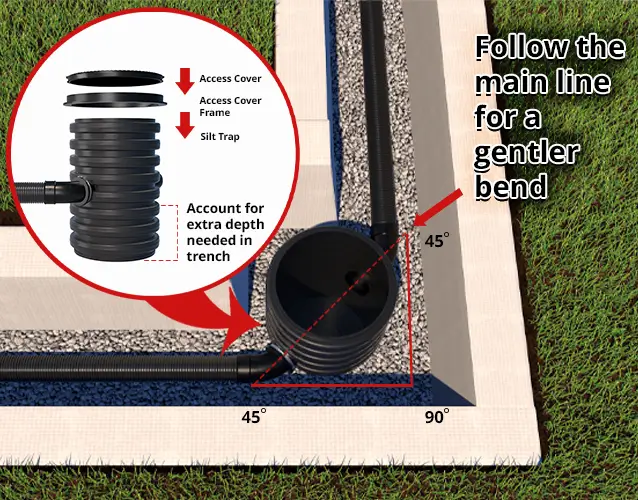
When you have a 90° turn in your pipeline and want to install an inspection chamber that has multiple outlets, like the one shown, it may seem logical to connect your twinwall pipe directly to the chamber inlet and the 90-degree outlet. However, while that is not an incorrect method, it is good practice to try to stay with the main channel in the inspection chamber whenever possible to aid the flow of water. This can be achieved by turning the base 45 degrees and using 45-degree bends on the inlet and outlet to make a slow 90° turn. This method does require more fittings than a direct connection to the 90-degree outlet, but the result is a much more efficient twinwall drainage system.
Inspection Chamber vs Silt Trap
If you are installing a perforated twinwall pipe system, it is recommended that you use a silt trap in place of an inspection chamber. This still facilitates inspection access but also helps to make sure any silt or debris that might get into the pipe is caught and can then be removed. The installation steps for a silt trap are largely similar to those for an inspection chamber, except that you need to allow for the extra depth of the trap base needing to sit below the pipeline.
Step 6. Test the Twinwall Drainage System
| Recommended Tools | |||||
|---|---|---|---|---|---|
| Bucket/Hose Pipe | Water | ||||
While not always mandatory, performing a system test after installation can provide valuable peace of mind and ensure your Twinwall drainage system functions as intended before closing up the trench. This should be done before the backfill stage so that you can more easily spot any leaks or flow restrictions. Adding some sidefill can help hold the pipes in place, though, so you may want to combine Step 6 and Step 7 together.
The Testing Process
- Partially Refill the Trench (Optional) - Begin sidefilling around the pipes and any inspection chambers, leaving the top sections exposed. This will help hold the system in place while still allowing you to observe water flow within the chambers.
- Introduce Water - Slowly introduce water into the system at the highest point (upstream end from the discharge point) using a hose or another suitable water source. Observe the water flow through the pipes and out the discharge point.
- Visual Inspection - Carefully examine the pipes and connections within the inspection chambers for any signs of leaks. Look for trickling water or damp spots that might indicate a faulty connection.
- Water Flow Rate - While testing, observe the water flow rate. The flow shouldn't be excessively rapid or sluggish. If the flow seems abnormal, consult the manufacturer's recommendations or seek guidance from a drainage professional.
Step 7. Sidefill and Backfill the Twinwall Trench
| Recommended Tools | |||||
|---|---|---|---|---|---|
| Knife/Hammer* | Drill** | ULTRA3 Pipework | Pipe solvent | ||
Once the twinwall drainage system has been placed into the trench and securely connected together, it's time to refill the trench and complete the Twinwall drainage system installation. Here's a closer look at this crucial step.
Refilling the Trench
- Fill Material Selection - The most suitable fill material will depend on whether you are installing a perforated or unperforated pipe system:
- Unperforated Twinwall Trench Fill Material - The best material to use for sidefill and backfill with unperforated pipes is typically the soil you removed from the trench during excavation. However, you’ll want to avoid using large rocks or debris directly around the pipes, so you may want to use a layer of sand, gravel, or filtered soil around the pipe instead if your excavated material is full of stones.
- Perforated Twinwall Trench Fill Material - Soil that contains large rocks or excessive clay content can restrict water flow to and from perforated pipes. For this reason, you should consider using alternative fill materials like crushed stone or gravel with stones or chippings no bigger than 50mm.
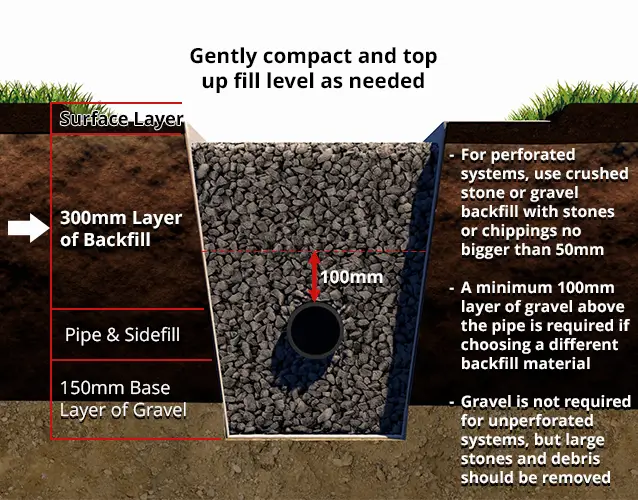
- Depth of Trench Fill - For both types of twinwall systems, you’ll need enough material to fill the trench on either side of the pipes until the tops are covered and then an additional 300mm layer above that to fill up the trench and leave enough space for you to replace your surface layer.
- Refilling Process - Begin carefully refilling the trench with the chosen backfill material. Start by placing the backfill material along the sides of the trench, gradually working your way up and in towards the centre. This helps to minimise voids and potential settling around the pipes.
- Stay Clear of the Trench Edges - While refilling the trench, ensure you and any helpers stay clear of the trench edges to avoid the risk of collapse.
Note: While we would strongly recommend using gravel for both side and backfill in a perforated twinwall drainage system, if you have good draining soil, you can use what you dug up instead for the backfill to save money. However, you must then make sure that the perforations in the pipe are well covered by the gravel sidefill.
Step 8. Compaction and Finishing the Twinwall Installation
| Recommended Tools | |||||
|---|---|---|---|---|---|
| Bucket/Hose Pipe | Water | ||||
Proper compaction of the backfill material is essential for a long-lasting and functional drainage system. Compaction ensures a stable base for the pipes, prevents future ground settling that could damage the system, and maintains proper drainage efficiency.
Compaction Methods
The specific compaction method will depend on the size of your project and the chosen backfill material.
- Small Projects - For smaller projects, you might use a hand tamper to compact the backfill in layers. Each layer should be approximately 150mm thick.
- Large Projects - For larger projects, using a mechanical compactor can expedite the process. Follow the manufacturer's recommendations for operating the compactor and ensure proper compaction throughout the backfill depth.
- Overfilling the Trench - Initially, overfill the trench slightly to account for potential settling of the backfill material after compaction. If the backfill layer is too low after compaction, top it up with more of your chosen material and then repeat the compaction process.
Finishing Touches
Once the backfill is compacted, you can move on to the final stage of the project, which involves closing up the trench:
- Close the Geotextile Layer - Fold in the flaps of excess geotextile on either side of the trench so that they overlap and cover up the gravel backfill.
- Replace the Surface Layer - Topsoil is a good choice if you plan to grow grass or other vegetation over the drainage system. If you already had grass over the installation area and removed it carefully when digging your trench, you should be able to re-lay it now, though you may still need some extra soil to bring it back level with the surrounding area. If your installation is beneath a driveway, road, or other hard surface, however, you may need to mix tarmac, concrete, or re-lay removed paving, so make sure you are well prepared for that extra step.
And that’s it! By following these steps, you should be able to successfully install a Twinwall drainage system that effectively manages water flow for your project.
If you have any questions or need further advice about your Twinwall drainage installation, contact JDP today. Our team of experts are always on hand to help with all of your civils and drainage needs.