A Twinwall drainage system is comprised of various components that work together to channel water efficiently. It may seem obvious that such a system will need a series of pipes, couplers, and bends, etc. However, being able to decide what pieces you need to build your system fully and how many of each to buy is an important part of the planning stage, so it’s worth making sure you have thought of everything.
Beyond the basic assortment of pipes and fittings, you also need to consider things like gravel and geotextile for your pipe trench and whether you should install an inspection chamber for maintenance purposes. To help you with this, we have compiled this helpful list of everything needed in a typical Twinwall drainage system, followed by a look at the potential tools you should consider having to hand to make your installation run as smoothly as possible.
Essential components of a Twinwall drainage system
When it comes to creating your Twinwall drainage system, the most obvious things you need to think about are the pipes and fittings, as without these, you have no system. So, here is a list of the most likely components you will need and the considerations you’ll need to make.
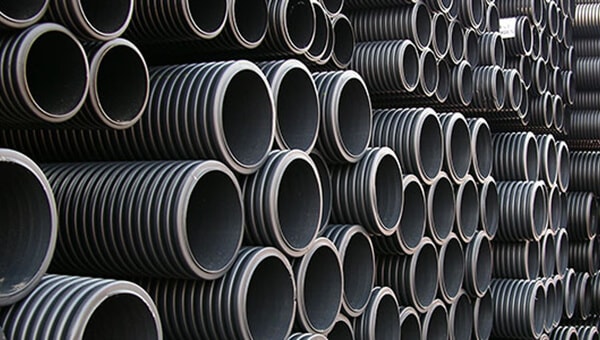
Twinwall Pipes
These are the workhorses of the system responsible for collecting and/or transporting water. To choose the right Twinwall pipes for your project, you’ll need to consider the following:
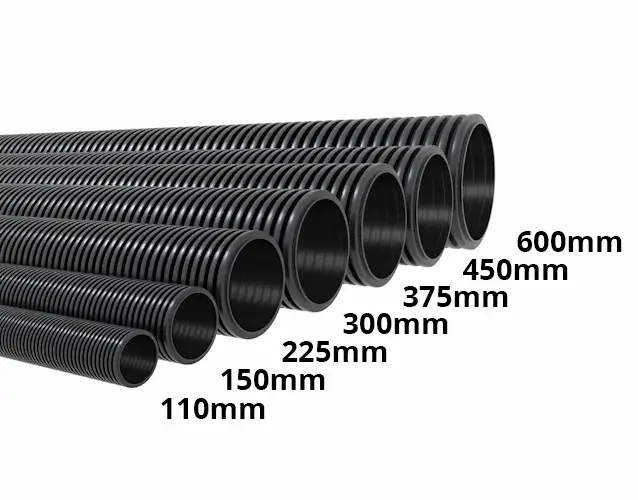
Diameter Selection
Typically ranging from 110mm to 600mm (though larger diameters are available for stormwater management), your choice of Twinwall pipe should be based on factors like the volume of water the system needs to handle and the type of application (e.g., draining a small garden vs a large driveway).

Material
High-Density Polyethylene (HDPE) is the standard material for Twinwall pipes, known for its strength, durability, and resistance to chemicals and corrosion.
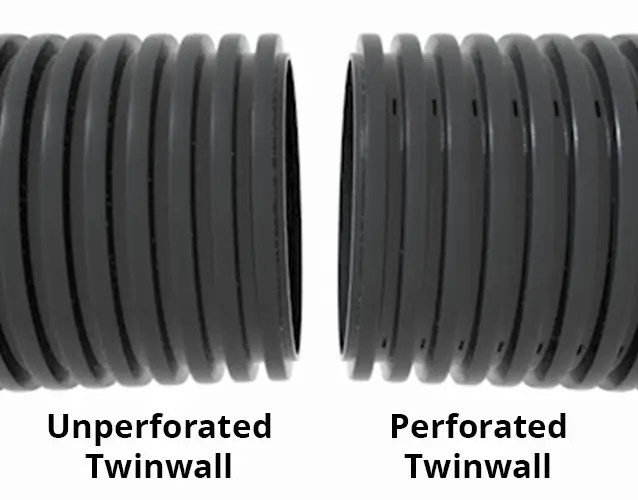
Unperforated vs. Perforated
These are the two main types of Twinwall pipe available, and each serves a different purpose:
- Unperforated Twinwall Pipes - Solid and without holes, these pipes are designed to transport water that has already been collected elsewhere. They're perfect for channelling surface water runoff from driveways, patios, or roadways to a drain or storm sewer system.
- Perforated Twinwall Pipes - These have tiny holes along the length of the pipe and are ideal for collecting water from the surrounding soil. Use them for drainage around foundations, agricultural fields, or sports fields.
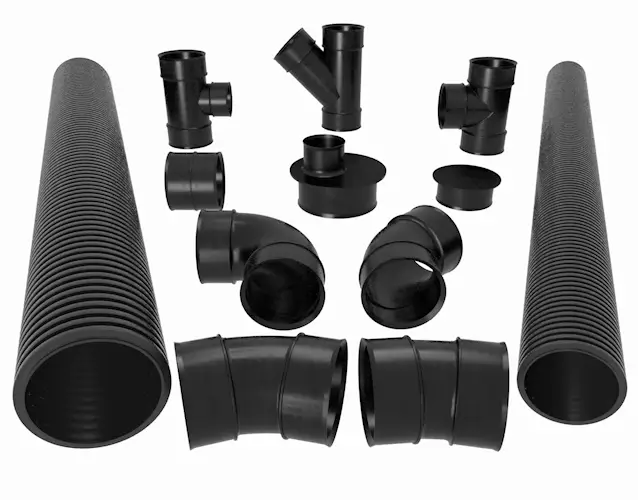
Twinwall Fittings
These connectors allow you to change the direction of pipes, create junctions, and connect pipes of different diameters. Here are some common types of Twinwall fittings:
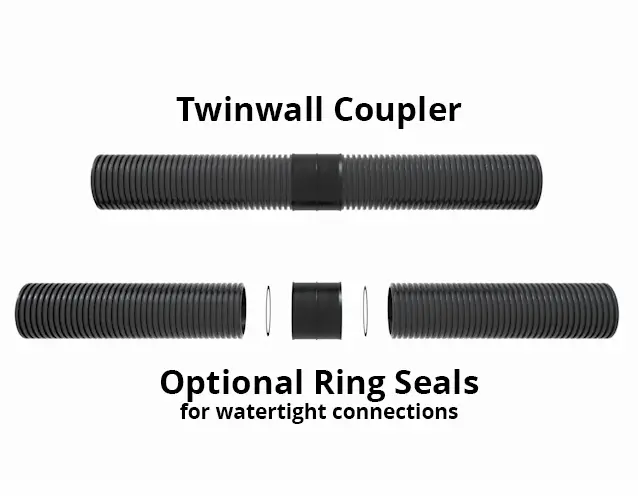
Couplers
Twinwall couplers are used to connect two pipes of the same diameter in straight runs.
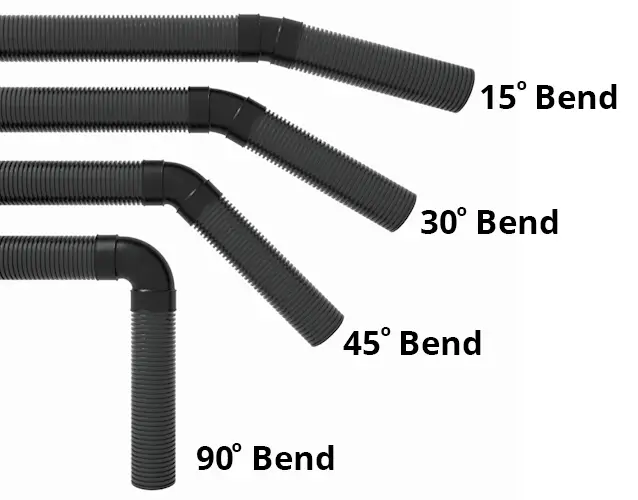
Bends
Twinwall bends are used to change the direction of the pipe path and are available in various angles (e.g., 90-degree bends, 45-degree bends).
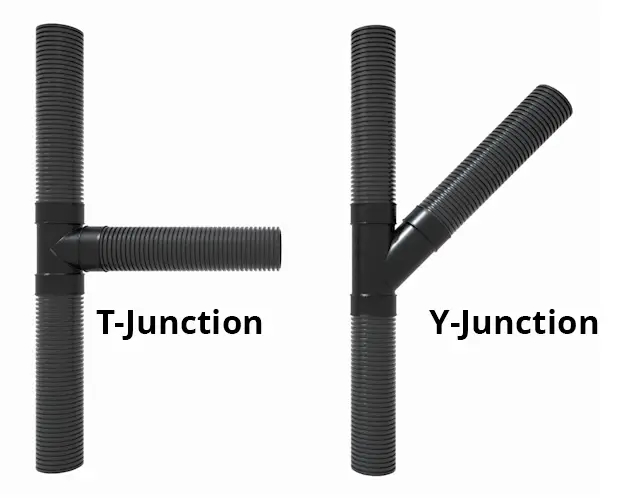
Junctions
Twinwall junctions are used to connect multiple pipes together at branching points in the system. Choose junctions with the appropriate angles (e.g., 90-degree T-junctions or 45-degree Y-junctions) to fit your layout.

Reducers
Twinwall reducers are used to connect pipes of different diameters. Use level invert reducers for changes in a straight run or reducer junctions to connect different diameter branches.
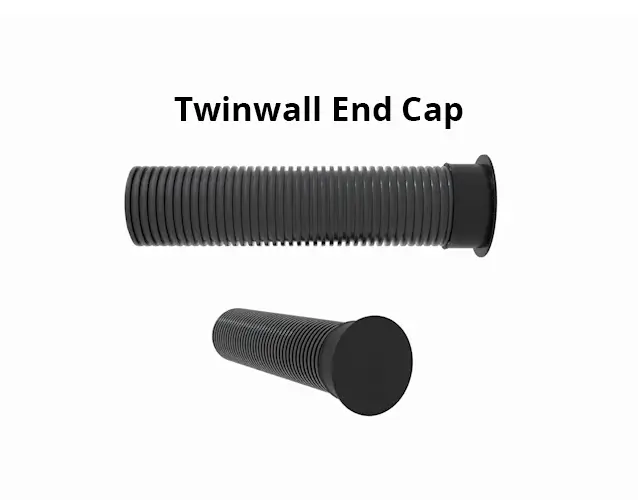
End Caps
Twinwall end caps are used to seal off the ends of pipes if they don't connect to other components.
Ring seals can be added to all of these fittings in order to create a watertight system.
Optional components of a Twinwall drainage system
With the obvious parts of the system out of the way, it’s time to look at some of the optional components that, while not always necessary, are often recommended to aid the efficiency and longevity of your system.
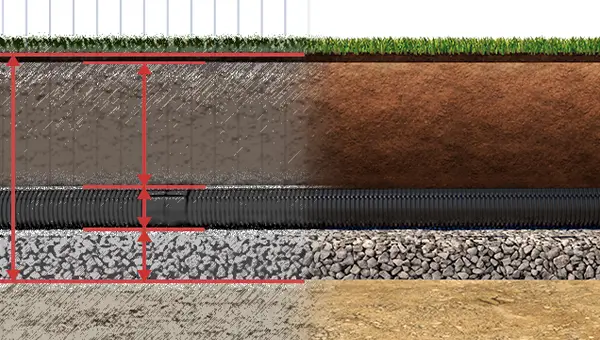
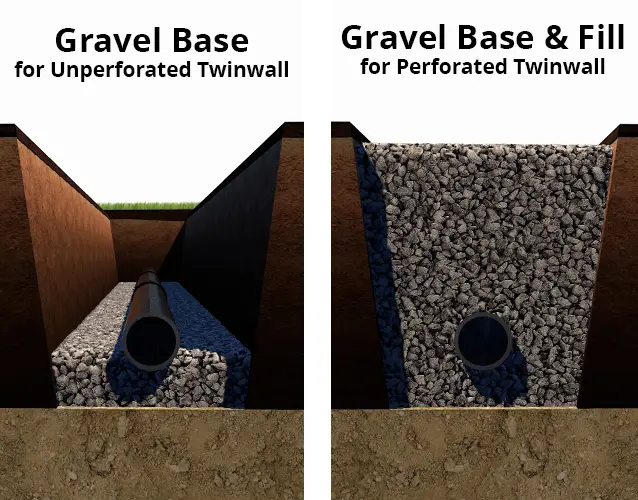
Gravel Layers
In most applications, a layer of gravel beneath the pipes can be beneficial for bedding and stability. In perforated systems, however, gravel should also be considered for use as sidefill and backfill material around the Twinwall pipes. Here’s a quick overview to explain why.
Benefits of using gravel in a Twinwall installation:
- Improved Drainage: The gravel layers create a void space around the perforated pipes, allowing water to enter more efficiently from the surrounding soil.
- Improved Filtration: The gravel acts as a natural filter, preventing sediment and debris from directly entering the perforations and potentially clogging the pipes over time.
- Pipe Stability: The gravel layer provides additional support and stability for the pipes and can help protect them from point loads or shifting soil conditions.
Do you need to use gravel in a Twinwall installation?
Gravel layers are particularly beneficial in areas with heavy clay soils or where maximising water collection is desired (e.g., agricultural fields).
For both perforated and unperforated Twinwall pipes, a bedding or base layer of gravel, typically 150mm, is recommended for stability. For perforated installation, however, we would highly recommend also using gravel for the sidefill and backfill to maximise the drainage and filtration potential of your system.
While gravel does offer clear advantages, however, it may not always be essential. Here are some scenarios where you might forgo the gravel layer:
- Non-cohesive Soils: In areas with very coarse or well-draining soils, the natural drainage capacity might be sufficient, and a gravel layer might not be necessary.
- Limited Space: If trench space is restricted, adding a gravel layer might not be feasible.
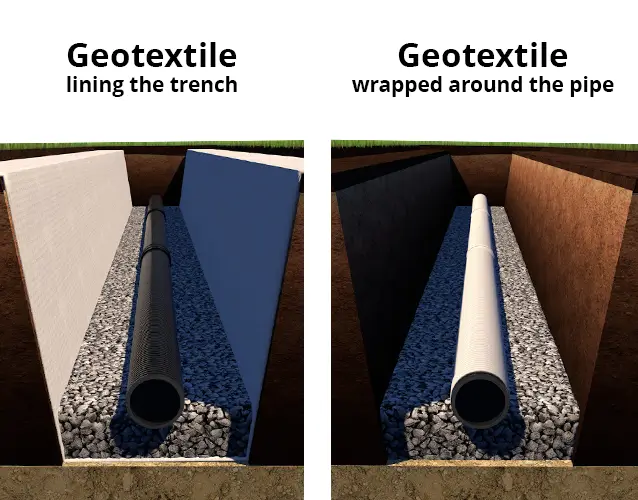
Geotextile Membranes
Geotextile membranes are a fabric-like material that can be placed around the gravel layer, if used, or around the pipes directly, if not, to further improve filtration in perforated systems.
Benefits of using a Geotextile Membrane in a Twinwall installation:
- Separation: The primary function of a geotextile membrane is to act as a separation layer. It prevents soil particles, especially fine particles in sandy soils, from migrating into the gravel layer (if used) or directly into the perforations of the pipes. This helps to maintain long-term drainage efficiency by preventing clogging.
- Filtration: While allowing water to pass through, the geotextile membrane helps filter out fine soil particles that might otherwise enter the pipes and could clog the drainage system.
- Weed Control: In some cases, a specific weed control fabric can be used to help prevent plant roots from infiltrating the drainage system, too.
Do you need to use a Geotextile Membrane in a Twinwall installation?
Geotextile membranes are only really needed for perforated Twinwall drainage systems, as they offer very little benefit for unperforated systems where fine particles and debris can’t filter in through the surrounding soil. For perforated systems, we would always recommend their use, at least directly around the pipes, as their benefits easily outweigh their additional cost.
That being said, we have listed them as an optional element of your installation, so here is a bit more detail on when they may or may not be necessary.
When is a Geotextile Membrane necessary?
- Fine or Sandy Soils: In projects with fine-grained or sandy soils, a geotextile membrane is highly recommended. The membrane acts as a barrier to prevent excessive soil movement and potential clogging of the drainage system.
- Areas with Significant Soil Movement: If your project site experiences frequent ground movement due to factors like freeze-thaw cycles or expansive soils, a geotextile membrane can help to minimise soil migration and protect the integrity of the drainage system.
When is a Geotextile Membrane not necessary?
- Coarse-Grained Soils: In projects with coarse-grained, well-draining soils (e.g., gravel), the natural filtering properties of the soil might be sufficient, and a geotextile membrane might not be necessary.
- Limited Space: If trench space is restricted, adding a geotextile membrane might be impractical.
Inspection Chambers
Inspection Chambers are access points built into the drainage system at strategic locations, typically along straight pipe runs or at junctions. Here's a quick look at why and when you might need them.
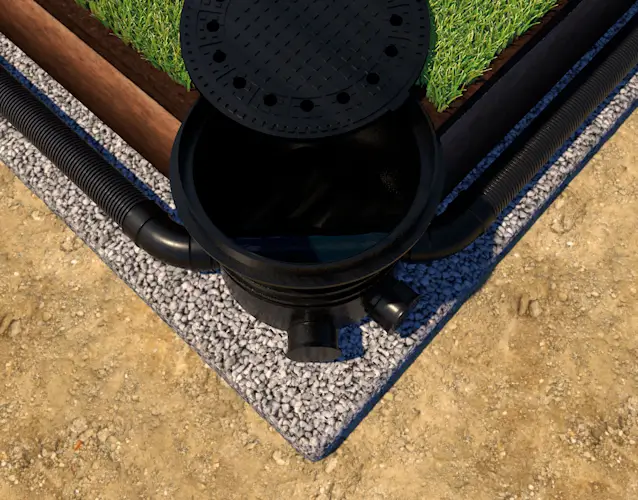
Benefits of Inspection Chambers
- System Maintenance: Inspection chambers provide access points throughout the drainage system. This allows for future cleaning, maintenance, and blockage removal if needed, giving easy access to a drain cleaning rod or a camera to inspect the system.
- System Monitoring: Inspection chambers allow you to visually monitor the water flow within the system at strategic points. This can be helpful during initial testing or for ongoing system checks.
Where to install inspection chambers in a Twinwall system
Inspection chambers are typically installed at key points in the system, such as:
- Changes in direction.
- Changes in pipe diameter.
- Junctions where multiple pipes converge.
- At the end of long pipe runs.
These locations are more susceptible to potential blockages, and inspection chambers facilitate easier access for cleaning or addressing any issues.
How to choose the right inspection chamber
For Twinwall drainage systems, choosing the most suitable inspection chambers is relatively simple, as the size of the pipe you choose will narrow down your options. Here’s a quick reference table of the chambers we stock matched to the various Twinwall pipe diameters.
Ultimately, as long as they are made from a durable material like polypropylene (PP) that can withstand underground pressure and environmental factors, are large enough to allow for easy access, and accommodate the diameter of the pipes being used in your system, you should be fine.
Do you need to use inspection chambers in a Twinwall installation?
For very small and straightforward Twinwall drainage systems, installing inspection chambers might be unnecessary and even impractical in some cases. This is especially true if your installation space is limited, as inspection chambers require a larger area to be excavated.
However, if your system is complex or covers a large area, incorporating inspection chambers becomes highly recommended for future maintainability and system longevity.
Additional tips for your Twinwall drainage system
- Match Pipe and Fitting Compatibility: Ensure the Twinwall pipes and fittings you choose are compatible with each other, typically indicated by the same pipe diameter and brand.
- System Complexity: The specific Twinwall system components you'll need depend on the complexity of your drainage project layout. For simpler layouts, you might only need pipes and a few bends. More intricate projects might require a wider variety of fittings and components. For the sake of performance, though, it is recommended that you try to keep your system as simple as possible without too many changes in direction.
- Follow Manufacturer's Instructions: The manufacturer's installation instructions for your specific Twinwall pipes and fittings are invaluable resources. These instructions will outline:
- Recommended Installation Practices: Following these ensures the proper connection of pipes, fittings, and proper bedding for optimal performance.
- Compatibility Information: The instructions will specify compatible fittings and any special tools required for specific components.
- Warranty Information: Proper installation following the manufacturer's instructions is often a prerequisite for maintaining the product warranty.
- Professional Guidance: If you're unsure about the specific Twinwall system components needed for your project, consulting with a drainage professional is recommended. They can help you select the appropriate pipes, fittings, and additional elements based on your specific drainage needs and system design.
By carefully selecting the right Twinwall system components and considering the optional elements like gravel and geotextile membranes, you should be able to build a functional and efficient drainage system for your property.
Twinwall Installation Tools and Safety Advice
Having all the right components for your Twinwall drainage system is all well and good, but if you don’t also have the right tools to prepare the trench and connect everything up, it isn’t going to do you much good.
Using the proper tools and prioritising safety is essential for a successful and hazard-free Twinwall drainage system installation. For that reason, we’ve put together the following list of tools and safety equipment that you might need:
Essential tools for installing Twinwall
- Excavation Tools:
- Shovel & Trowel – For general soil removal and trench shaping.
- Pickaxe – For breaking up hard ground or compacted soil.
- Trenchers (Optional): Large-scale projects or deep trenches might benefit from using a mechanical trencher for faster excavation. Trenchers must always be operated according to safety guidelines and manufacturer instructions.
- Pipe Cutting Tools:
- Saws – Standard saws might work for smaller-diameter pipes. However, for clean and precise cuts, consider using saws specifically designed for Twinwall pipes. These saws often have fine teeth to prevent crushing the pipe walls.
- Pipe Cutters: Specialized pipe cutters designed for Twinwall pipes offer a clean and efficient cutting method. Consider using these for a more professional finish and ease of use.
- Joining Tools (Optional): The specific tools needed for joining pipes will depend on the type of fitting system you're using. Some systems might utilise snap-fit connections, while others might require clamps or solvent welding (refer to manufacturer's instructions).
- Spirit Level - To ensure the trench maintains the proper gradient for optimal water flow.
Recommended Safety Gear
Safety should never be an afterthought. Here's the essential safety gear you should wear throughout the installation process:
- Personal Protective Equipment (PPE):
- Head Protection - A hard hat is crucial to protect your head from falling debris or potential cave-ins during excavation.
- Safety Glasses – Protect your eyes from flying debris or dust particles during excavation and cutting.
- Work Gloves - Heavy-duty work gloves protect your hands from cuts, scrapes, and blisters.
- Sturdy Boots: Offer ankle support and protection from slips, falls, or injuries from stepping on sharp objects or uneven terrain.
- High-Visibility Clothing - Especially important if working near roads or in low-light conditions.
- Hearing Protection (Optional) - Consider using ear protection if using noisy power tools like trenchers or saws.
- Dust Mask/Respirator (Optional): In dusty conditions, a mask or respirator can help protect your lungs from inhaling dust particles.
Safe Digging Practices
- Call Before You Dig: This is the most important safety step (see previous section "Underground Utilities" for details).
- Underground Utilities: Always be aware of the location of underground utilities and avoid working near them. If you encounter an unmarked utility line, stop work immediately and contact the relevant utility company.
- Shoring for Deep Trenches: If your trench is deeper than 1.2 metres (4 feet), proper shoring is essential to prevent trench collapse. Consult a qualified professional for shoring techniques and recommendations.
- Safe Lifting Techniques: Use proper lifting techniques to avoid back strain or injuries when handling pipes and other materials. Bending your knees and lifting with your legs is crucial.
- Maintain a Safe Working Posture: Avoid excessive bending, twisting, or awkward postures while working in the trench. Take breaks regularly to stretch and avoid fatigue.
- Buddy System: Working with a partner allows for increased safety and someone to call for help in case of an emergency.
- Entry and Exit: Use a safe ladder for entering and exiting deep trenches. Never jump into or out of a trench.
Additional Safety Tips
- Have a Fire Extinguisher on Hand: In case of unexpected fire hazards during excavation work.
- Be Aware of Weather Conditions: Avoid working in extreme weather conditions like heavy rain or strong winds.
- Know Your Limits: Don't hesitate to seek help from qualified professionals if you encounter any difficulties or have concerns about safety during the installation process.
By prioritising safety and using the appropriate tools, you can minimise risks and ensure a smooth Twinwall drainage system installation. Remember, safety should always be your top priority!
And that’s it for our guide to everything you’ll need to build your Twinwall drainage system. Once you feel ready to purchase any of the components discussed here, head over to our Twinwall Store, where we have a comprehensive range of pipes and fittings available to suit most applications. We have also created a comprehensive step-by-step Twinwall installation guide. to help with the next step of your project.
If you feel that you need more information before you go any further, we have a whole series of other Twinwall articlesavailable to help. Alternatively, you can contact our team of experts, who are always on hand to help with all of your civils and drainage needs.